
waffle maker instructions
Waffle makers have gained popularity for their ease of use and versatility in creating delicious breakfast treats. They offer a fun way to enjoy crispy, golden waffles at home.
1.1 Overview of Waffle Makers and Their Popularity
Waffle makers have become a popular kitchen appliance due to their ease of use and versatility. They allow users to create crispy, golden waffles quickly and effortlessly at home. With various models available, from basic to advanced, waffle makers cater to both casual cooks and baking enthusiasts. Their popularity stems from the joy of making homemade waffles, which can be customized with diverse ingredients and toppings, making them a staple in many kitchens worldwide.
1.2 Benefits of Using a Waffle Maker
Using a waffle maker offers numerous benefits, including easy cleanup, quick cooking times, and the ability to create perfectly crispy waffles. It allows for customization with various ingredients and toppings, making breakfast or brunch more exciting; The non-stick surfaces of modern waffle makers prevent sticking and ensure even cooking. Additionally, they are versatile, accommodating both sweet and savory recipes. This convenience makes waffle makers a valuable addition to any kitchen, enhancing your culinary creativity and efficiency.
Ingredients and Tools Needed
Essential ingredients include flour, sugar, eggs, milk, and baking powder. Tools required are a waffle maker, mixing bowls, a whisk, and measuring cups for precision.
2.1 Essential Ingredients for Waffle Batter
The basic ingredients for waffle batter include 1 3/4 cups of flour, 2 tablespoons of sugar, 2 eggs, 1 3/4 cups of milk, and 1 tablespoon of baking powder. Additionally, 1/2 cup of oil or melted butter is needed for moisture. Optional add-ins like vanilla extract or flavorings can enhance the taste. Ensure all ingredients are fresh and at room temperature for optimal results. This combination creates a balanced batter that yields light and crispy waffles.
2.2 Required Tools and Equipment
To make waffles, you’ll need a waffle maker, a large mixing bowl, and a whisk or electric mixer. Measuring cups and spoons are essential for accurate measurements. A ladle is handy for pouring batter onto the waffle plates. Optional tools include a double waffle maker for efficiency or a spatula for handling waffles. Ensure all equipment is clean and ready before starting the batter preparation. These tools will help you achieve perfectly cooked waffles every time.
Preparing the Batter
Mix dry ingredients like flour, sugar, and baking powder in a bowl. In another bowl, combine wet ingredients such as milk, eggs, and oil. Gently fold them together until smooth, avoiding overmixing for a fluffy texture.
3.1 Mixing Dry Ingredients
In a large bowl, combine flour, sugar, baking powder, and salt. Sift the mixture to ensure even distribution and incorporate air. Add a pinch of salt to balance sweetness. For extra flavor, include optional spices like cinnamon or cocoa powder. Mix gently to avoid creating lumps. This step ensures a smooth batter base, promoting even cooking. Keep the dry ingredients ready before adding wet components. Avoid overmixing to maintain a light, fluffy texture.
3.2 Combining Wet Ingredients
In a separate bowl, whisk together milk, eggs, melted butter, and vanilla extract. Ensure the mixture is smooth and well-combined. Adjust milk quantity for desired batter consistency. For fluffier waffles, add a little extra egg or use buttermilk. Avoid over-whisking to prevent eggs from becoming too frothy. This step creates a creamy base that will blend with dry ingredients for a perfect batter texture. Keep the mixture ready to combine with dry ingredients.
3.3 Combining Wet and Dry Ingredients
Gently fold the wet ingredients into the dry mixture until just combined. Avoid overmixing, as it can make the batter dense. Stop once no visible flour streaks remain. For a lighter texture, let the batter rest for 2-3 minutes to allow the flour to absorb the liquid fully. If the batter feels too thick, add a splash of milk. This step ensures a smooth, even consistency, ready for cooking in the waffle maker.

Preheating the Waffle Maker
Plug in and turn on the waffle maker. Allow it to preheat for 3-5 minutes until the indicator light turns on or a clicking sound is heard. This ensures the plates are evenly heated for cooking. Some models may require greasing after preheating for non-stick performance. Always follow the manufacturer’s guidelines for optimal results.
4.1 How to Preheat the Waffle Maker
To preheat the waffle maker, plug it in and switch it on. Allow it to heat up for 3-5 minutes until the indicator light turns green or a clicking sound is heard. Some models may have a temperature dial, so set it to your desired heat level. Once preheated, the waffle maker is ready for batter. Always ensure the plates are evenly heated before pouring in the batter to achieve perfect cooking results. Follow the manufacturer’s instructions for specific preheating times and settings.
4.2 Greasing the Waffle Plates
Before first use, lightly grease the waffle plates with cooking oil or spray to prevent sticking. For non-stick models, this step may not be necessary. After preheating, ensure the plates are evenly coated. Excess oil can be wiped off with a paper towel. Regular greasing helps maintain the non-stick surface and ensures easy waffle removal. Always unplug the waffle maker before cleaning or applying oil to avoid accidents. Proper greasing enhances the cooking experience and extends the lifespan of the waffle maker.
Cooking the Waffles
Pour the batter evenly, close the lid, and cook until the timer goes off or steam stops. Ensure waffles are golden brown before serving.
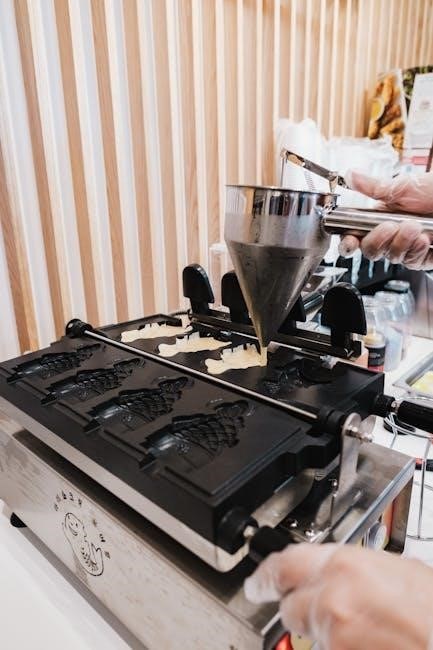
5.1 Pouring the Batter into the Waffle Maker
Once the waffle maker is preheated and greased, pour the batter evenly across the plates. Use a ladle or pitcher to spread it in a spiral pattern, ensuring full coverage without overfilling. Close the lid gently to avoid splashing. Allow the batter to cook until the indicator lights up or steam stops. Adjust the batter amount based on the waffle maker’s size for perfect results. Let it cook undisturbed for crisp edges and a fluffy interior.
5.2 Cooking Time and Temperature
The ideal cooking time for waffles typically ranges from 3 to 5 minutes, depending on the waffle maker’s temperature and batter thickness. Most waffle makers operate between medium to high heat settings. A medium-high temperature ensures a golden-brown finish. Look for indicator lights or a timer to signal when the waffles are done. If your waffle maker doesn’t have a timer, check for steam stopping and a crispy appearance. Adjust the heat as needed for consistent results.
5.3 Flipping or Rotating the Waffle Maker
For even cooking, some waffle makers require flipping or rotating midway through cooking. If your maker has a flip mechanism, gently rotate it 180 degrees after 2-3 minutes. For non-flip models, check if the waffles are browning evenly. If not, carefully lift the edges to ensure heat distributes evenly. Avoid over-flipping, as this can disrupt the waffle’s structure. Always use oven mitts or tongs to handle hot surfaces. Proper flipping ensures a crispy exterior and fluffy interior.
Tips for Making Perfect Waffles
For perfect waffles, ensure the batter is smooth, preheat the maker thoroughly, and don’t overfill. Light indicators and even pouring help achieve ideal results.
6.1 Achieving the Perfect Golden Brown Color
To achieve a perfect golden brown color, preheat the waffle maker until it reaches the optimal temperature. Lightly grease the plates to prevent sticking and promote even browning. Pour the batter evenly, covering the surface without overfilling. Cook for the recommended time, usually 3-5 minutes, until the waffles are crispy and golden. Avoid opening the maker too soon, as this can disrupt the cooking process and result in uneven color.
6;2 Avoiding Common Mistakes
To ensure perfect waffles, avoid common pitfalls. Overmixing batter can lead to dense, tough waffles, so mix wet and dry ingredients just until combined. Opening the waffle maker too soon disrupts cooking, causing undercooked centers. Overfilling the plates results in messy overflow and uneven cooking. Ensure the maker is properly preheated and greased to prevent sticking. Avoid using too much oil, as it can create a greasy texture. By following these tips, you’ll achieve light, fluffy, and evenly cooked waffles every time.
Cleaning and Maintenance
Regular cleaning ensures your waffle maker lasts longer and performs optimally. Unplug it, let it cool, then wipe plates with a damp cloth. Avoid harsh chemicals.
7.1 How to Clean the Waffle Maker
To clean your waffle maker, unplug it and let it cool completely. Use a damp cloth to wipe down the plates and exterior. For stuck-on batter, mix equal parts water and white vinegar, apply to the plates, and let sit for 10 minutes before wiping clean. Avoid harsh chemicals or abrasive scrubbers, as they can damage the non-stick surface. Regular cleaning prevents residue buildup and ensures optimal performance. Always clean after each use for best results.
7.2 Storage and Maintenance Tips
Store your waffle maker in a cool, dry place, away from direct sunlight. After cleaning, ensure it is completely dry before storing to prevent rust or mold. If you have a non-stick model, avoid stacking items on top of it to protect the coating. For long-term storage, consider using a protective cover. Regularly conditioning the plates with a light layer of oil can maintain non-stick performance. Proper care extends the lifespan and ensures consistent waffle quality over time.
Troubleshooting Common Issues
Common issues with waffle makers include sticking, undercooking, or overcooking. These problems can often be resolved by adjusting heat settings, batter consistency, or greasing the plates properly.
8.1 Waffles Sticking to the Plates
Waffles sticking to the plates is a common issue that can be resolved by ensuring the waffle maker is properly preheated and greased. Lightly brush the plates with cooking oil or non-stick spray before use. Avoid overmixing the batter, as this can create a dense texture that adheres more easily. If waffles still stick, try adjusting the heat or cooking time slightly. Cleaning the plates regularly also helps maintain their non-stick surface and prevents residue buildup, ensuring smooth waffle release every time.
8.2 Undercooked or Overcooked Waffles
Undercooked waffles may lack crispiness, while overcooked ones can become too dark or dry. To avoid this, ensure the waffle maker is preheated properly and adjust cooking time based on the manufacturer’s guidelines. Most waffle makers have indicators to signal when they’re ready. Avoid opening the lid too early, as this can disrupt the cooking process. If waffles are undercooked, cook for an additional minute. For overcooked waffles, reduce the cooking time slightly. Adjusting the heat setting can also help achieve the perfect texture.

Advanced Waffle Recipes
Explore unique recipes like Belgian waffles with caramelized sugar or Liege waffles, offering distinct textures and flavors. These advanced recipes elevate your waffle game with creativity.
9.1 Belgian Waffles
Belgian waffles are a delicious variation known for their thick, fluffy texture and deep pockets. Made with a yeast-based batter, they yield a lighter, airier waffle. The process involves preheating the waffle maker, pouring the batter, and cooking until golden brown. Belgian waffles are often served with fresh fruits, whipped cream, or syrup, making them a perfect treat for breakfast or dessert. Their unique taste and texture set them apart from standard waffles, offering a more indulgent experience.
9.2 Liege Waffles
Liege waffles are a unique and indulgent treat made with a rich dough instead of batter. They feature chunks of caramelized Belgian pearl sugar, creating a crispy exterior and a sweet, chewy interior. The dough is allowed to rise, giving the waffles a light and airy texture. Liege waffles are cooked in a waffle maker like traditional waffles but require a slightly longer cooking time to caramelize the sugar. They are often enjoyed as a dessert, topped with fresh fruit or whipped cream.
Making waffles is a delightful process that combines simplicity with creativity. With the right tools and techniques, you can enjoy perfectly cooked, golden waffles every time.
10.1 Final Tips for Enjoying Your Waffles
For the best experience, serve waffles hot with your favorite toppings, such as fresh fruits, syrup, or whipped cream. Experiment with different recipes and ingredients to find your perfect flavor. Store leftover waffles in an airtight container for up to two days and reheat them in a toaster or oven for crispiness. Don’t forget to clean your waffle maker regularly to ensure it remains in great condition for future use. Happy cooking!